
OnJuly 30 at 5:00 PM PT, Modern Campus will be releasing 2026.2 with a couple of helpful updates to improve
content management. The CMS will not be available for up to an estimated 60 minutes.
Publishing Accessible Web Content: A Quick Guide
The Department of Justice has extended the compliance deadline for public entities
to meet Web Content Accessibility Guidelines (WCAG) 2.1 Level AA to April 26, 2027. While this provides additional time to address existing legacy content, new content published today should already meet accessibility requirements whenever
possible.
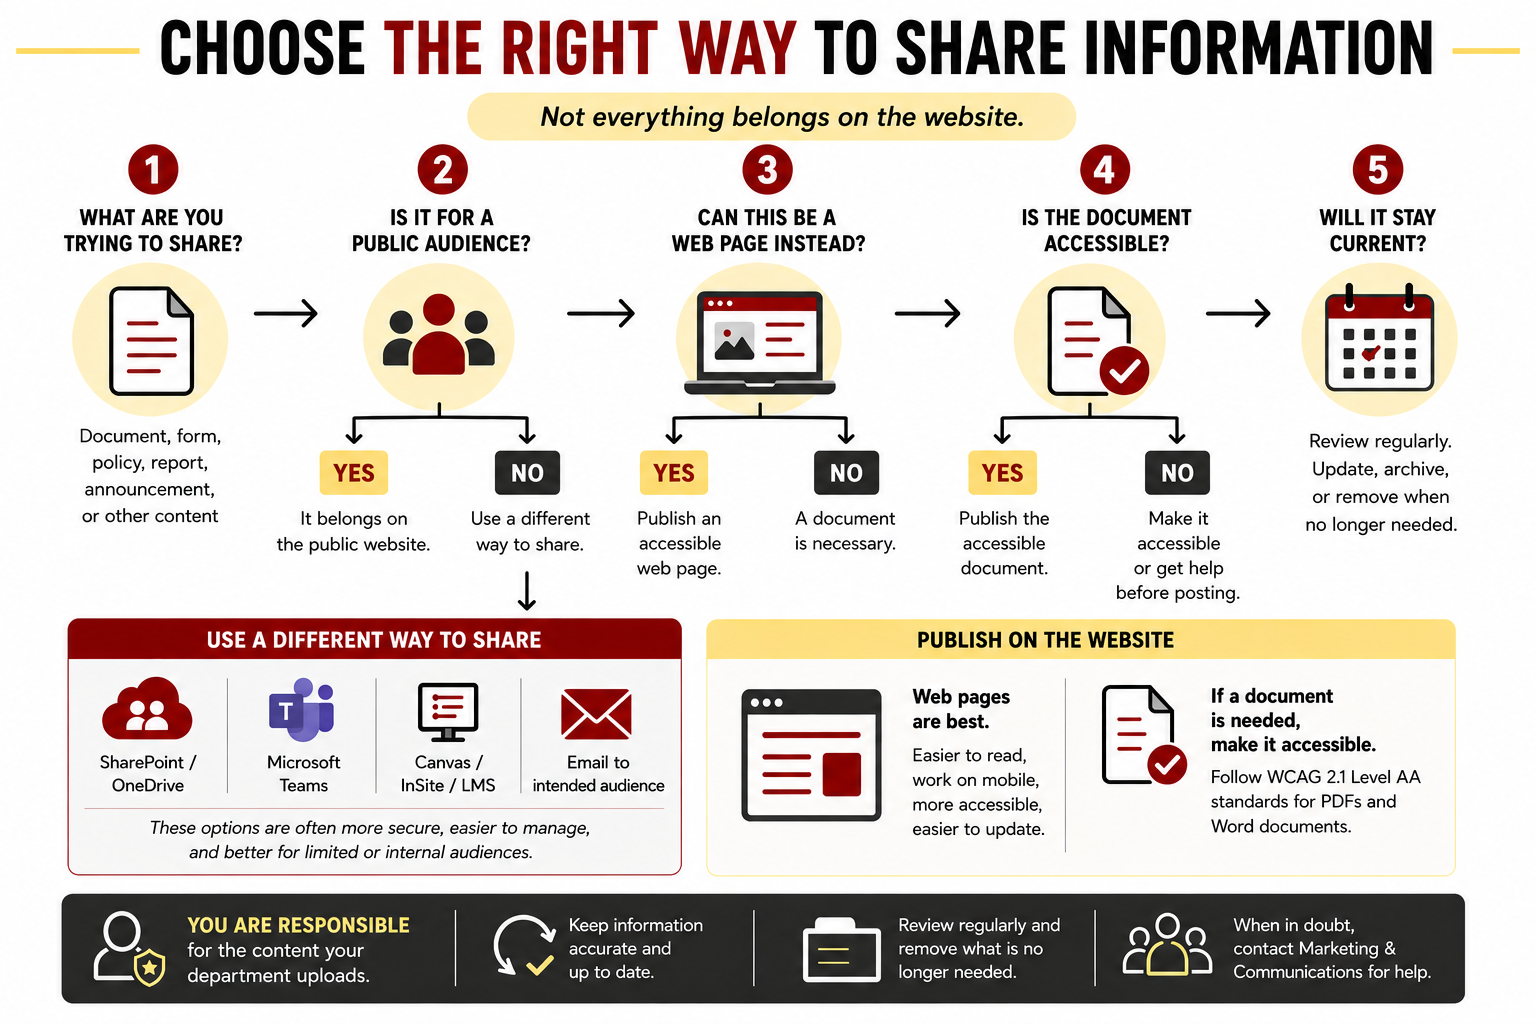
Before uploading a document, please take a moment to ask these five questions:
1. Does this information belong on the public website?
The website is intended to share information with the public—not to serve as a storage
location for departmental files. If the audience is limited, another campus system
may be a better choice.
These options are often more secure, easier to manage, and better for internal or
limited audiences because it's a more direct approach.
2. Could this information be a web page instead?
If the content is primarily text, an accessible web page is usually easier for everyone
to read, easier to maintain, works better on mobile devices, and is more accessible
than a PDF.
Does the document need to be public for all? Turn into a web page.
Does the document need to remain as a PDF? Make it accessible or ask for help.
Will it stay current or can it be archived or removed when no longer needed? Have a long-term plan.
3. Does this document need to remain online?
Many documents are temporary. Consider whether the information has an expiration date
or should be reviewed regularly. Outdated documents create confusion and increase
the amount of content that must be maintained.
5. Who is responsible for keeping this content current?
Each department is responsible for reviewing and maintaining the information it publishes.
If a document is no longer accurate or serves no ongoing public purpose, it should
be updated, replaced, or removed.
Need Help?
Our goal is to make information easier for everyone to access while keeping the website
accurate, current, and manageable. If you're unsure whether something belongs on the
website—or whether there's a better way to share it—we're happy to help.
Tagging a PDF for Accessibility in Adobe Acrobat Pro
This guide provides step-by-step instructions for creating accessible PDF that meet
WCAG 2.1 Level AA and ADA Title II requirements for web and mobile content.
Summary of Key Accessibility Requirements
Add tags and structure (WCAG 1.3.1 – Info and Relationships)
Ensure logical reading order (WCAG 1.3.2 – Meaningful Sequence)
Add alternative text to images (WCAG 1.1.1 – Non-text Content)
Use proper headings (WCAG 1.3.1)
Fix tables with headers (WCAG 1.3.1)
Create descriptive links (WCAG 2.4.4 – Link Purpose)
Step 1: Open Accessibility Tools
Open your PDF in Adobe Acrobat Pro.
Select Tools > Accessibility.
Open the following panels:
Accessibility
Tags (View > Show/Hide > Navigation Panes > Tags)
Reading Order
Step 2: Check for Existing Tags
Look in the Tags panel for a tag structure such as <Document>.
If no tags exist, select Autotag Document.
Note: Autotagging is only a starting point and must be reviewed for accuracy.
Step 3: Fix Tag Structure (WCAG 1.3.1)
Ensure the document has a logical structure using tags such as:
<H1> for the main title
<H2>, <H3> for sections
<P> for paragraphs
<L> for lists
<Table> for tables
To fix tags:
Right-click a tag in the Tags panel.
Select Properties to change the tag type.
Drag and drop tags to correct the reading hierarchy.
Step 4: Set Reading Order (WCAG 1.3.2)
Open the Reading Order tool.
Select Show Reading Order Panel.
Review the numbered order on the page.
Adjust order by dragging elements or reassigning content types.
Common issues include incorrect reading order in multi-column layouts.
Step 5: Add Alternative Text to Images (WCAG 1.1.1)
Locate <Figure> tags in the Tags panel.
Right-click and select Properties.
Add meaningful alternative text describing the image.
Example: “Bar chart showing enrollment increased from 2020 to 2024.”
Mark decorative images as artifacts using the Reading Order tool.
Step 6: Use Proper Headings (WCAG 1.3.1)
Ensure headings are tagged correctly (not just visually styled).
Use the Reading Order tool to assign list formatting if needed.
Step 8: Fix Tables (WCAG 1.3.1)
Locate the <Table> tag.
Ensure rows (<TR>), headers (<TH>), and data cells (<TD>) are correct.
Use the Table Editor to define header cells and scope.
Step 9: Create Accessible Links (WCAG 2.4.4)
Ensure link text clearly describes the destination.
Avoid vague text like “click here.”
Example: “View ADA Title II accessibility requirements.”
Step 10: Set Document Language (WCAG 3.1.1)
Select File > Properties.
Go to the Advanced tab.
Set the document language (e.g., English).
Step 11: Run Accessibility Checker
Select Tools > Accessibility > Full Check.
Review results and fix identified issues.
Note: Automated checkers do not detect all accessibility issues. Manual review is required.
Why This Matters
Accessible PDFs support screen readers, keyboard navigation, and meaningful structure
for all users.
WCAG 2.1 ensures content is perceivable, operable, understandable, and robust.
ADA Title II requires effective communication and accessible digital content.
Quick Accessibility Checklist
Tags are present and correctly structured
Reading order is logical
Headings are properly tagged
Images include alternative text
Tables include header cells
Links are descriptive
Document language is set
Helpful video:
This video, The Accessibility Guy walks through four different methods to tag content within a PDF using Adobe Acrobat
Pro DC, helping ensure your files meet accessibility standards for screen readers
and assistive technologies.
The best template for creating accessible documents is a simple one that uses clear
structure and the built-in document tools available in your software. This link below
provides an example of a simple starter document designed for exporting to an accessible
PDF.
Please keep in mind that adding too many elements to a document can make it inaccessible. Common issues
include improper tagging, missing titles, lack of alt text for images, poor color
contrast, and unclear link structure.
We recommend reviewing the courses and resources listed on this page for guidance.
If you have additional questions or need clarification, please contact web support for assistance.
How to export from Word to PDF and running the checker
When saving from Word or another program, choose Save As → PDFand ensure that “Best for electronic distribution and accessibility” or “Tagged PDF”
is selected.
Avoid using “Print to PDF,” as this strips out accessibility tags.
Tags are the structural markers in a PDF that tell assistive technology what content is
(headings, paragraphs, lists).
Check if your PDF is tagged: In Acrobat, go to File → Properties → Description → Look for “Tagged PDF: Yes.”
If it says “No,” you will need to add tags manually in Acrobat.
Re-run Accessibility Check
After making fixes, run the Accessibility Checker again to confirm compliance.
A fully compliant PDF should pass with no errors, though some warnings may require
manual review.
Alt text (alternative text) is a concise, written description of an image embedded
in digital content, enabling screen readers to convey visual information to users
with visual impairments. It should be brief (ideally under 125 characters), contextual,
and accurately describe the image's content or function.
Key fundamentals of effective alt text include:
Context over Description: Focus on why the image is there, not just what it looks
like.
Conciseness: Keep descriptions under 125 characters.
Avoid Redundancy: Do not start with "image of" or "photo of" as screen readers already
announce the element as an image.
Contextual Accuracy: If an image carries functional meaning (e.g., a search icon),
describe its function ("Search") rather than its appearance ("magnifying glass icon").
Decorative Images: If an image is purely for decoration, use an empty alt attribute
(alt="") so screen readers skip it.
Handling Complex Images: For graphs, charts, or maps, provide a short summary in the
alt text and a detailed description in the surrounding text or a linked document.
Accessibility and SEO: Good alt text improves both accessibility for visually impaired
users and SEO, as search engine crawlers use it to understand image content.
Examples:
Good: alt="A golden retriever puppy sitting on a wooden dock."